

This guide serves as an introduction to the most common philosophies in debate. By the end of this guide, debaters will be able to:
-
- Apply philosophies to strengthen or weaken arguments.
- Differentiate the three main branches of philosophy.
- Engage constructively with philosophies that are commonly used in competitive debates.
This guide is meant to serve as a quick introduction for philosophy as it is commonly used in competitive debate contexts. Readers should keep in mind the purpose of this guide as they use it. Philosophy is as old as recorded history, and this guide is less than 25 pages long. As such, this guide should
serve as a beginning, not an end, for your investigation of these philosophical concepts. In addition, the reader should recognize that the focus here is how these philosophies are applied in competitive debate and does not necessarily reflect the most current understandings of professional philosophers. I am a former debater, a debate coach, and a political scientist, not a professional philosopher. The goal of this guide is to be accurate and useful, not to be a philosophical treatise itself.
To serve the goals of this guide, I have included several things to make it useful to the new debater. First, each section includes examples from recent Big Questions resolutions as to how the concept being discussed has been employed in the debate (of note, this guide is made mostly for Big Questions Debaters, though other debaters may find it useful!). I have also included pieces of evidence that have been commonly used in debate, to display how debaters have defended these positions in the past. Finally, I have included links to places where you can learn more about these philosophical issues (in many cases, from professional philosophers!).
Debate is a wonderful place for testing out ideas and determining what you think about them. Hopefully this guide introduces you to some new ways of thinking and leads you to wanting to know more.

Simon Sheaff
Simon Sheaff is a PhD Student in Political Science at the University of Maryland. Simon is an NSDA alum, competing primarily in policy debate in high school and college. He has coached policy debate at Baylor University, and the U.S. Naval Academy at Annapolis, and is currently the policy debate coach at Dowling Catholic High School in Des Moines, Iowa.
How do I correct a name spelling or make a name change to my school roster?
Name changes and corrections are made by the national office. If a coach or a student name is misspelled or a name change has occurred, on your school roster, please email info@speechanddebate.org.
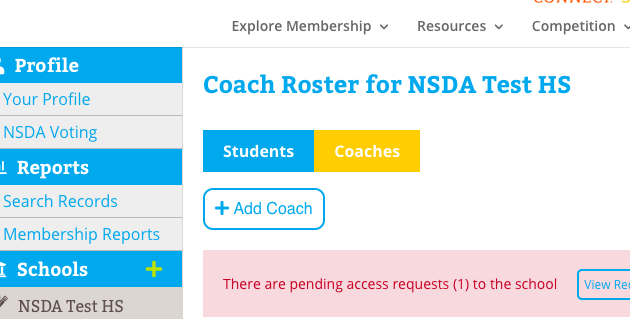
How do I add or transfer a coach?
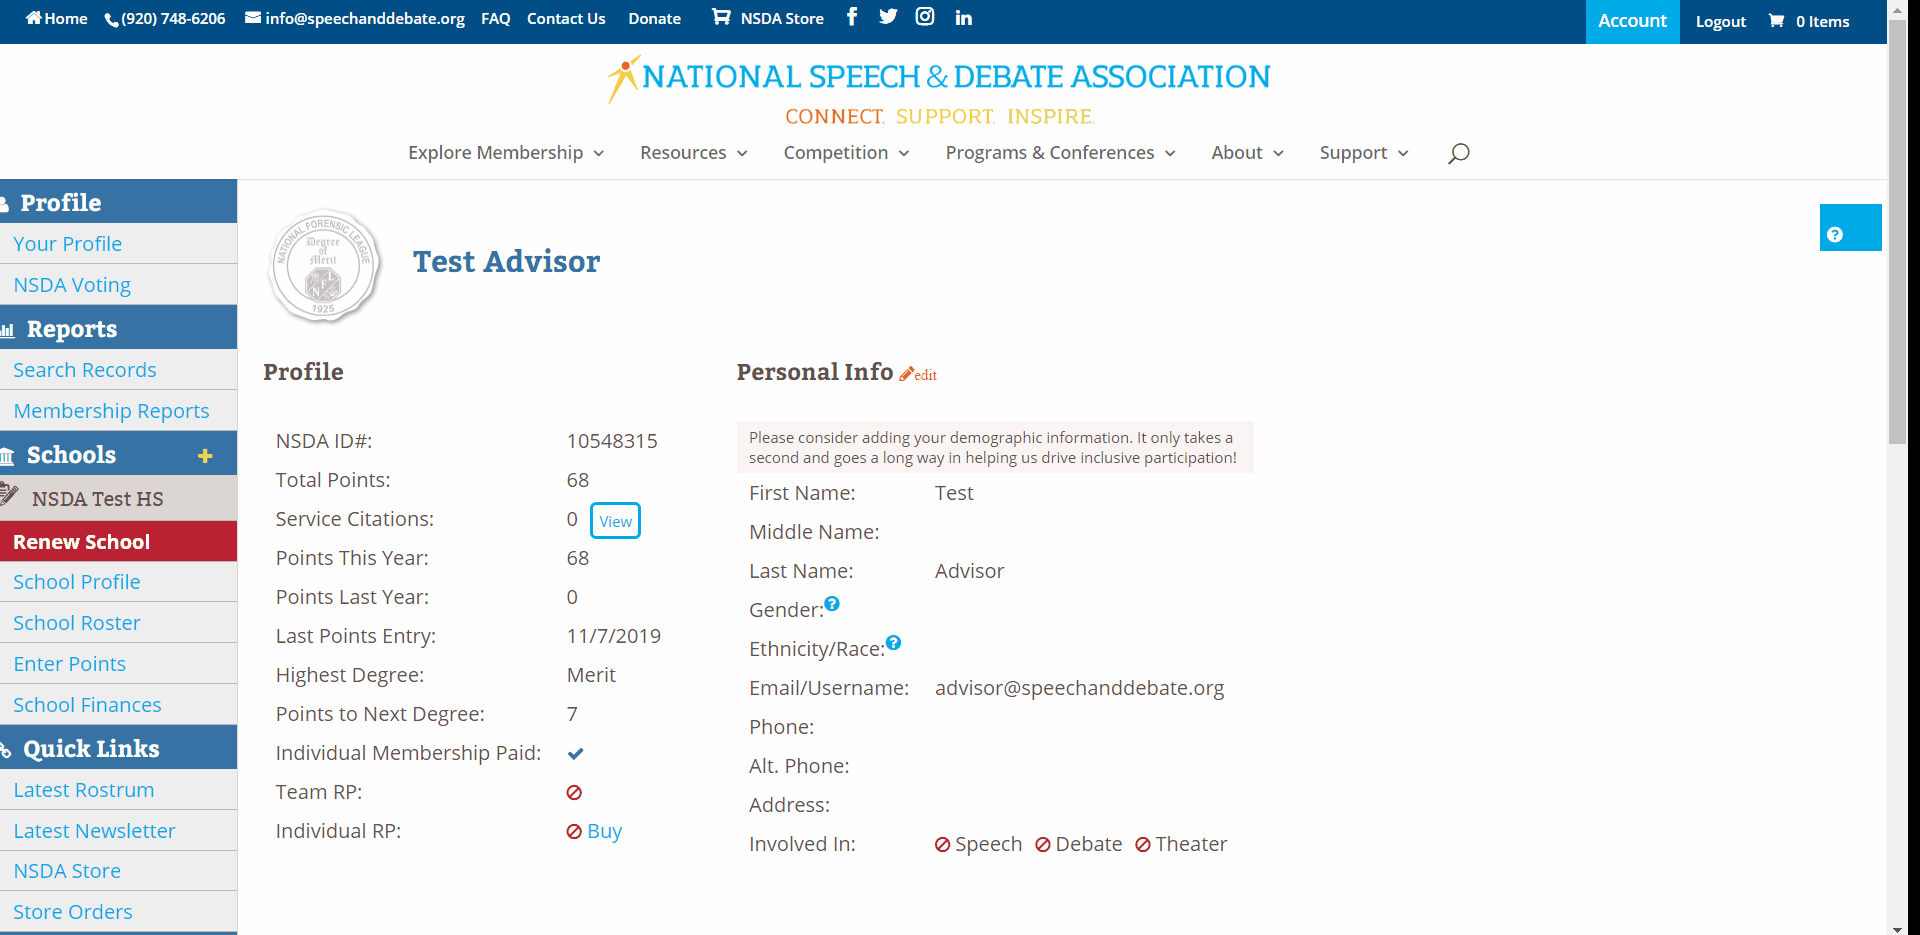
- Go to www.speechanddebate.org and click Member Login in the top right corner of the page. Use your username and password to log in to your account. Once you’ve logged in, click “Account” in the upper right corner, which will take you to your profile page.
- On the left side of your screen, click School Roster. The screen that opens will say Student Roster for (School Name). Make sure that you are on the Coach Roster by looking for the yellow Coaches box at the top of the screen.
- Click on the blue outlined box that reads, Add Coach.
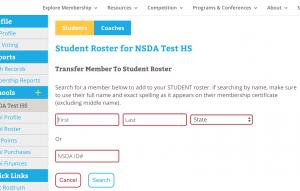
- Next, answer the question, “Does this person already have an NSDA ID number, either because they competed or coached at another school (MS or HS), or have already created an account?”
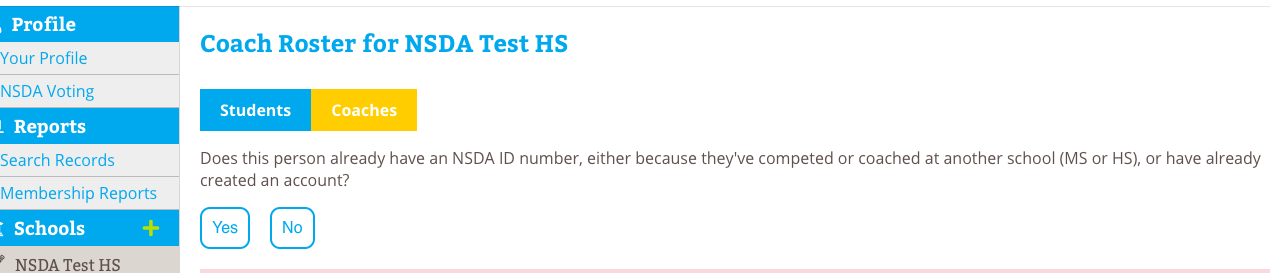
- If answered yes, then you can add the coach’s first name, last name, and state and click Search or enter their coach ID number and click Search.
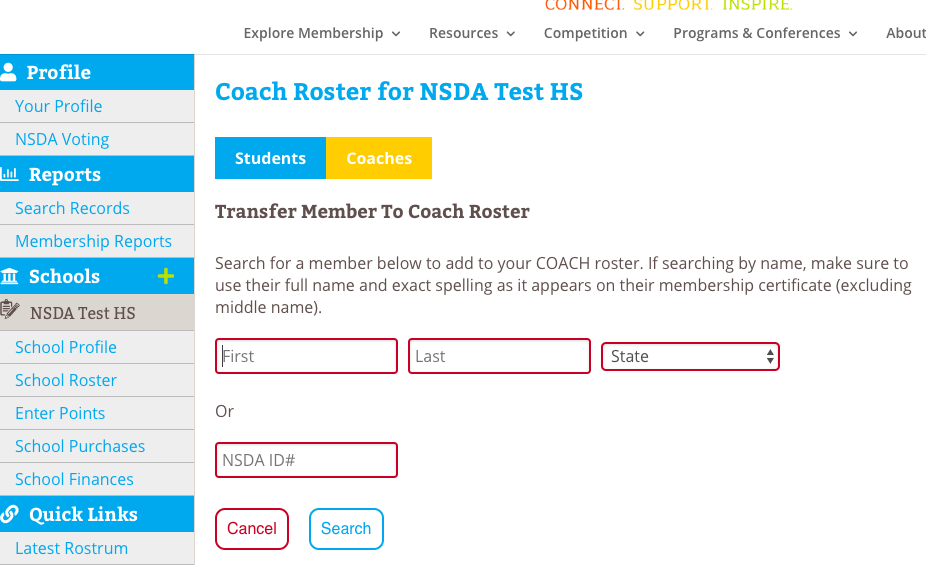
- Review the results to find the correct coach and then click Transfer and Confirm.
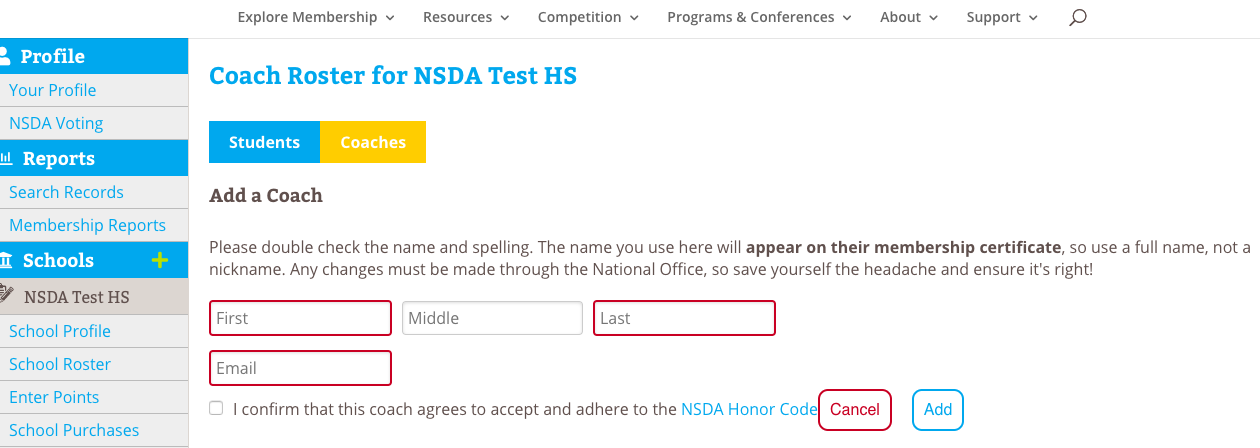
- If answered no, then you can the coach’s first name, last name, and email address and then click the box that the coach agrees to the NSDA Honor Code, then click Add and Confirm.
Note: If you need to add a student into a coaching roster (because they’ve graduated and are now coaching), you must search for them using the name they used while competing or you can enter their ID number from their high school student record. When the new coach is added, they will be listed with all of the points they earned as a high school competitor.
If the student (who is now a coach) graduated prior to 1996, they will not be in our system but will be in our paper files. Please send an email to info@speechanddebate.org with the coach’s name, the school and state they are coaching at, as well as their name when they graduated from high school, the school and state they graduated from, and the grad year. Once we have this information, we can manually add their high school points to their new coaching record.
How do advisors accept linked account requests?
Advisors must approve student and coach accounts that are attempting to be linked to a school.
- Go to www.speechanddebate.org and click Member Login in the top right corner of the page. Use your username and password to log in to your account. Once you’ve logged in, click the “Account” button, in the upper right-hand corner, which will take you to your profile page.
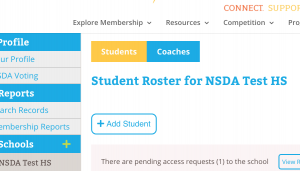
- On the left side of your screen, click on School Roster. The screen that opens will say Student Roster for <School Name>.
- Scroll to where you see a shaded rectangle that reads There are pending access requests (number of requests) to the school. Click the “View Requests” button.
- When the next screen loads, click Merge to merge students or coach to any existing records by using the drop down box next to their name. When merging, be sure you check the drop down list in case a student registered under a slightly different name (e.g., “Carlos Cortes” vs. “John Carlos Cortes”). If the student or coach isn’t already on your roster, click Create New. Once you’ve chosen to merge or create new, click the blue rectangle to the right to confirm.
Need a Visual? Click to watch our brief tutorial! (Merging Accounts | Creating New)
(The GIF will loop continuously; there is no audio.)
How do I link students to my school in Tabroom?
- When logged in to Tabroom.com, click your school under Institutions from the menu on the right. If you do not see Institutions on the right, click your email at the top of the page.
- Next, click the Competitors tab.
- From the menu on the right (under NSDA Points), click Import NSDA Competitor Roster.
- Scroll to the bottom of the page and click Import Students.
- Your NSDA Roster is now synced with Tabroom.com. Anytime a change or add is done on the NSDA side, you must follow the steps above in order to “sync” again.
Need a Visual? Click here to watch a video demonstration!
How do I add or transfer a student?
- Go to www.speechanddebate.org and click Member Login in the top right corner of the page. Use your username and password to log in to your account. Once you’ve logged in, click “Account” in the upper right corner, which will take you to your profile page.
- On the left side of your screen, click School Roster. The screen that opens will say Student Roster for (School Name). Make sure that you are on the Student Roster by looking for the yellow Student box at the top of the screen.
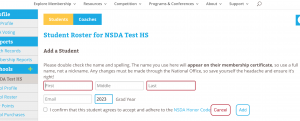
- Click on the blue outlined box that reads, Add Student.
- Next, answer the question, “Does this person already have an NSDA ID number, because they competed at another school (MS or HS), or have already created an account?”
- If answered yes, then you can add the student’s first name, last name and state and click Search or enter the student ID number and click, Search.
- Review the results to find the correct student and then click Transfer and Confirm.
- If answered no, then you can add the student’s first name, middle name, last name, email address and grad year and then click the box that the student agrees to the NSDA Honor Code, and click Add.
How can I change my username (email) and/or my password?
Please login with your current username (email) and password. Click the “Account” button in the upper right corner and then from the left menu, click “Change Username” to update your email and “Change Password” to update your password.
If you are unable to log in, click “Forgot your password”
Help! I forgot my username/password or can't get signed in!
If you’re having trouble getting signed in, you can reset your password by clicking the link at the bottom of the Member Login page, or using the direct links below:
If you don’t remember your username, which has to be an email address, you’ll need to contact us.
Make sure to check your spam folder if you don’t get the reset/reminder email!
If you didn’t sign up using an email address, there’s no way for us to email you—so you’ll need to contact us.
How do I correct points that have been entered incorrectly?
Note: In order to maintain accurate records, points are not editable. If points have been entered incorrectly, the record must be deleted and re-entered. This allows the NSDA to maintain a record of all changed/deleted points.
- Go to speechanddebate.org and click Member Login in the top right corner of the page. Use your username and password to log in to your account. Once you’ve logged in, click “Account” in the upper right corner, which will take you to your profile page.
- On the left side of your screen, click on Enter Points. The screen that opens will say Enter Points for <School Name>. (Note: If Auto Posted points need to be confirmed, you’ll instead see a screen requesting you to do so. For more information about this process, see the directions for How to confirm pending autoposted points. If you’d like to skip confirming autoposted points, click on the red outline box that says Not now, skip to manual entry.)
- Scroll down to “Recent Point Entries” in the table at the bottom that need to be corrected and click the red trash icon in that row (in the Delete? column). The page will ask you to confirm your choice to delete. Click Confirm in the orange box. (Note: Only the last 6 months of entered points will show here. If points are older than 6 months, please email info@speechanddebate.org with the details of what needs to be deleted and we can take care of that for you.)
- You’ll know you successfully deleted the points when they disappear from your screen.
- Reenter the points in question as if entering them for the first time.
- Repeat as needed.
Need a Visual? Click here to watch our brief tutorial!
(The GIF will loop continuously; there is no audio.)
How do I confirm pending autoposted points?
-
- Go to www.speechanddebate.org and click Member Login in the top right corner of the page. Use your username and password to log in to your account. Once you’ve logged in, click “Account” in the upper right corner, which will take you to your profile page. (Please note, in order to confirm pending autoposted points, you have to be a chapter advisor or a coach with permissions.)
- On the left side of your screen, click on Enter Points. If you have autoposted points that you need to confirm, a screen will load that has the title Confirm Pending Autoposted Points for <School Name>.
- If you are concerned that the pending autoposted points were manually entered, click the box next to words Show overlaps with manual points. This will highlight the already-entered points in red. If points were already entered manually, then you should click Ignore for each entry that has already been entered manually. This will take the entry off the autopost points page so you will no longer see it.
- Check the autoposted entries for result and coach accuracy. Change the coach as needed. When ready to confirm points, click on the blue outlined button that says Confirm. If you’d like to confirm all autoposted points, you may also click on Confirm All.
- If a pending autopost entry shows incorrect results, then you should contact Tabroom.com or SpeechWire because the actual results may need editing. Or, you can manually enter points for the same dates as the autoposted tournament and not use the autoposted points. If you manually enter points, then you should go in and click Ignore for the entry that you entered manually so it disappears from the autopost points list.
Entering manually does not apply to District and National points as the point values are higher than other tournaments. If a district or national auto post entry is incorrect, they should contact the National Office.
What are autoposted points?
The more efficient way to enter student points is with the autoposting feature. Points for tournaments hosted on Tabroom.com or SpeechWire are available for autoposting within two weeks of the tournament date. Advisors can log in and confirm pending autoposted points rather than calculating them and entering them manually.
In order for points to show in auto post, when clicking “Enter Points”, a student must be linked from the NSDA roster to the program used (ie: Tabroom, SpeechWire and Joy of tournaments). For Joy of tournaments click “Refresh NSDA Student List” from the “Entries” tab.
How to Add Points Using +Add Row
- Go to speechanddebate.org and click Member Login in the top right corner of the page. Use your username and password to log in to your account. Once you’ve logged in, click the “Account” button, in the upper right-hand corner, which will take you to your profile page.
- On the left side of your screen click on Enter Points. The screen that opens will say Enter Points for <School Name>. (If auto posted points need to be confirmed, you’ll instead see a screen requesting you to do so. For more information about this process, see the directions for Confirming Pending Autoposted Points. If you’d like to skip confirming autoposted points, click on the red outline box that says Not now, skip to manual entry.)
- The tables you see at the top of the screen provide you information about how points are calculated for different types of competitive events. If you don’t need this information, it is collapsible by clicking the triangle next to the words Point Values.
- Enter the information about the tournament your students attended. If you are entering service points, you will put the type of service in the first box.
- Scroll down to the box that says Choose Student. Begin selecting the correct student, category, and coach. Then enter their ranks or win/loss/no decision record.
- To add additional students (or events for a student), click on the blue outlined box that says + Add Row. Enter the required information. Repeat as needed.
- When finished adding students and/or events, click on the blue outlined box that says Finish.
- You’ll be asked to confirm the entries you are about to make and to certify that the points were earned in accordance with the NSDA Code of Honor. Once you’ve clicked I agree, click the blue outlined box that say Confirm.
- Repeat as needed.
Need a Visual? Click here to watch our brief tutorial!
(The GIF will loop continuously; there is no audio.)
How to Add Points Using Bulk Add
- Go to www.speechanddebate.org and click Member Login in the top right corner of the page. Use your username and password to log in to your account. Once you’ve logged in, click the “Account” button, in the upper right-hand corner, which will take you to your profile page.
- On the left side of your screen click on Enter Points. The screen that opens will say Enter Points for <School Name>. (If auto posted points need to be confirmed, you’ll instead see a screen requesting you to do so. For more information about this process, see the directions for Confirming Pending Auto Posted Points. If you’d like to skip confirming auto posted points, click on the red outline box that says Not now, skip to manual entry.)
- The tables you see at the top of the screen provide you information about how points are calculated for different types of competitive events. If you don’t need this information, it is collapsible by clicking the triangle next to the words Point Values.
- Enter the information about the tournament your students attended. If you are entering service points, you will put the type of service in the first box.
- Scroll down to the blue outlined button that says Bulk Add and click on the button.
- Click on the names of the students you’d like to enter points for. Once you’ve selected all of the students needed, scroll down so that you see the rows with each students name, category, and coach. (You can change all of these categories at once by changing the Default Category and Default Coach and then clicking the blue outlined box with the words Apply All.)
- Then enter their ranks or win/loss/no decision record.
- After entering the required information, scroll down to the last row of entries and click the blue outline box that says Finish.
- You’ll be asked to confirm the entries you are about to make and to certify that the points were earned in accordance with the NSDA Code of Honor. Once you’ve clicked I agree then click the blue outlined box that says Confirm. If you enter one whole event’s worth of points and go all the way through to confirm them, the system will clear the entries but keep your previously entered tournament info so you don’t have to re-enter the tournament information.
- Repeat as needed.
Need a Visual? Click here to watch our brief tutorial!
Can I manually add points to more than one student at a time?
There are ways to make points entry for multiple students more efficient.
1. Entering points in partner events: In the row already provided choose a student and provide category and coach information, then use the Clone a Row (icon: two overlapping boxes) function on the far right of that row to create a new entry for which you only need to change the student’s name to their partner’s.
Need a Visual? Click here to watch our brief tutorial!
(The GIF will loop continuously; there is no audio.)
2. Entering all the points for one event at once: In the row already provided choose a student enter the event and coach to whom the points will go, then click the Bulk Add button to select all the students who competed in that event for whom you want to apply points. Once you’ve added all the students, use the Clone to All (icon: the blue group) on the far right of the first student’s row to apply the event and coach information to all the entries. Then enter the appropriate points for each student, hit Finish, and you can do the same thing for another event.
Need a Visual? Click here to watch our brief tutorial!
(The GIF will loop continuously; there is no audio.)
3. Entering service points for a group: Follow the same steps you would to enter several students in the same event, but also complete the service description and results to apply all the information to the students you’ve submitted in Bulk Add at once using the Clone to All function.
Need a Visual? Click here to watch our brief tutorial!
(The GIF will loop continuously; there is no audio.)
What is points entry and how do I do it?
One of the cornerstone offerings of membership is the Honor Society, which allows schools to maintain their student roster online on our website and add points for their participation in competitive events and service activities. As these points accumulate, students achieve higher levels, or degrees, in the Honor Society. Coaches also earn all of the students’ points toward their own levels of recognition.
Students can be added to rosters and given points before they are made members by paying the fee, and can earn up to 75 points before the advisor decides to purchase their membership. Points can be added manually by the advisor, who can enter results from tournaments for each student, or automatically if the tournament runs via Tabroom.com or SpeechWire.
When a student earns 25 points, they earn the Degree of Merit, which makes them eligible to compete at the district tournament. For more information on earning degrees, visit the Honor Society page of our website.
To learn more about points entry, visit our Points Entry page!
How do I purchase a coach membership?
Advisors can purchase a coach membership for themselves or another coach by following these steps:
1. Go to speechanddebate.org and click Member Login in the top right corner of the page. Use your username and password to log in to your account. Once you’ve logged in, click “Account” in the upper right corner, which will take you to your profile page.
2. Click “School Roster” then “Coaches” tab
3. Click the coach who has the word “Buy” in the “Paid” column
4. The next screen shows only those coaches whose individual membership has not been invoiced yet
Toggle the button, from the left to the right for a coach you want to create an invoice for (Note: prepaid memberships do not apply to coaches, only students)
5. Click the button, “Create Invoice and Proceed to Checkout”
6. In the next screen, you can do any of the following:
- Click “Pay Now” to pay with a credit card
- Click “Invoices” and then the invoice number then
- Click button, “Email Invoice” to email the invoice to yourself
- Click button, “Download PDF” to download the invoice to print so you can give to your finance office
* If you’re paying by credit card, you must pay your entire balance.
Download our helpful flow chart with step-by-step instructions on purchasing individual coaching memberships.
Need a Visual? Click here to watch our brief tutorial!
(The GIF will loop continuously; there is no audio.)
How do I activate auto billing for memberships?
- Go to www.speechanddebate.org and click Member Login in the top right corner of the page. Use your username and password to log in to your account. Click the “Account” button, in the upper right-hand corner, which will take you to your profile page.
- On the left side of your screen, click on School Profile. The screen that opens will say your school’s name at the top in blue.
- Scroll down to where it says Autobill 25+ pts: and click the toggle button to activate auto billing. An orange pop up will come on your screen that asks you to confirm this change. Click Confirm. The toggle will then turn blue.
- Once you’ve completed this process, an invoice will be created for unpaid memberships with at least 25 points, on the 1st and 15th of each month. You’ll have 30 days to pay that invoice.
Please see the How to Retrieve an Old Invoice and How to Make a Payment instructions on this page for help finding and paying for invoices.
How do I make a payment?
- Go to www.speechanddebate.org and click Member Login in the top right corner of the page. Use your username and password to log in to your account. Once you’ve logged in, click the “Account” button, in the upper right-hand corner, which will take you to your profile page.
- On the left side of your screen, click on School Finances. If you have an outstanding balance, the next page will have a red rectangle that reads Your balance of <$XX.XX> is outstanding. Next to that text will be a blue button that reads Pay Now. When you click that button, you’ll be taken to the invoice screen.
- Click on the blue number for the invoice you’d like to pay, then choose and provide the required payment method information, and then click the blue outlined box that says Pay. If you’re paying by credit card, you must pay your entire balance. To pay individual invoices, we ask that you print the invoice, include a check, and mail to us at our West Des Moines office.
How do I retrieve an old invoice?
- Go to speechanddebate.org and click Member Login in the top right corner of the page. Use your username and password to log in to your account. Once you’ve logged in, click the “Account” button, in the upper right-hand corner, which will take you to your profile page.
- On the left side of your screen, click on School Finances and you’ll be taken to a page with a blue bar that has several different options including Invoices. Click on Invoices and you’ll see a chart with all the invoices you’ve created.
- Select the invoice you are looking for by clicking on the blue invoice number, and it will open that invoice.
- On the invoice screen, you have the options of emailing the invoice, downloading it as a PDF, or paying the invoice. To print an invoice, first download it as a PDF and then print the PDF.
Need a Visual? Click here to watch our brief tutorial!
(The GIF will loop continuously; there is no audio.)
How do I apply a credit or prepaid school membership to an invoice?
- Log in to your NSDA account on www.speechanddebate.org and click “Account” in the top right corner of the page. Note: Clicking on “School Profile” from your profile will show details about your school, including your current balance. A negative balance (i.e. $-200) indicates the amount of available credit to use for paying invoices.
- Click on the “Renew School” button in the column along the left-hand side of your profile page. This button will appear in red.
- Review all of your school’s information to ensure that it is accurate and up to date. Scroll to the bottom of the page and click “Next Step”. Review your coaches roster for accuracy and click “Next Step” again.
- Select all memberships for which you would like to make a purchase. The school’s membership of $149 (high school) or $75 (middle school) will be automatically selected. You can also choose to purchase the Resource Package and prepaid individual memberships. Once you have selected everything you would like to purchase, click “Create Invoice and Proceed to Checkout.”
- After creating the invoice, you will see that the credit that you had on your account was automatically applied to the invoice you created. If the credit covered the entire invoice, you will see the invoice as Paid with $0 due. If the credit covered only a portion of the invoice total, you will see the modified total needed to pay at the bottom. For example, if you have $51 in credit and create an invoice for the school’s membership of $149, the total on the invoice will now show up as $98. Once your entire invoice for prepaid membership has been paid, your membership will activate automatically. Note: If there is any remaining credit after the dues are paid, credit will be applied to any invoice until the credit is gone. Credit can be found by clicking school profile. Click to view example of an account with a credit.
Need a Visual? Click here to watch our brief tutorial!
(The GIF will loop continuously; there is no audio.)
How do I apply pre-paid student memberships?
- From the “School Roster” student tab, click on the “Buy” button
- Next, toggle the button for each student’s membership you want to purchase so it includes the fee in the total
- Check the box, “Use Prepaid?” for each student you want applied to the prepaid amount (after checking the box, it will tell you how many you have used and how many you have left). If you are not seeing the “Use Prepaid” box after toggling a student, then the invoice is not paid in full yet. Do not proceed until the invoice is paid or you will be invoiced for those members toggled
- If the prepaids cover the entire invoice, the total should show 0.00 at the bottom of the page
- Create the invoice and proceed to checkout
Need a Visual? Click here to watch a video demonstration!
How do I purchase individual student memberships?
How it works: Advisors must select the students for which they’d like to buy memberships and create invoices for those memberships. Note: If you created an invoice for pre-paid memberships and the prepaid invoice is paid in full, please see “How do I generate an invoice and apply pre-paid student memberships?“
- Go to speechanddebate.org and click Member Login in the top right corner of the page. Use your username and password to log in to your account. Once you’ve logged in, click “Account” in the upper right corner, which will take you to your profile page.
- On the left side of your screen, click on School Roster. The screen that opens will say Student Roster for <School Name>.
- Next to each student’s name (in the Member column) will either be a blue checkmark or a red circle with a line through it and the word Buy. Click Buy next to any student and the next screen will show all of the students whose memberships need to be paid.
- Use the slider to the left of each name to select which students you wish to add to your invoice. Once you’ve selected the appropriate names, scroll to the bottom of the page and click the blue outlined box that says Create Invoice and Proceed to Checkout.
- The screen will show a red rectangle that reads Your balance of <$XX.XX> is outstanding. Next to that text will be a blue button that reads Pay Now. When you click that button, you’ll be taken to the invoice screen.
- Click on the blue number for the invoice you’d like to pay, then choose and provide the required payment method information, and then click the blue outlined box that says Pay. If you’re paying by credit card, you must pay your entire balance. To pay individual invoices, we ask that you print the invoice, include a check, and mail to to us at our West Des Moines office.
Need a Visual? Click here to watch our brief tutorial!
(The GIF will loop continuously; there is no audio.)
How do I sign up for the first time or renew?
- Program advisors can visit www.speechanddebate.org and click Member Login in the top right corner of the page. Use your username and password to log in to your account. Once you’ve logged in, click “Account” in the upper right corner, which will take you to your profile page. Please click “Renew School”, in red, from the left menu and follow the prompts at the top of the page to renew your school.
- High school membership is $149, with an option to upgrade to the all-school team Resource Package for an additional $199. Each individual high school student membership is a one-time $20 fee.
- Middle school membership is $75, with an option to upgrade to the all-school team Resource Package for an additional $199. Each individual middle school student membership is a one-time $10 fee.
- To finalize the renewal, follow the prompts on the page to review the following:
Step 1. Confirm information on the school profile page. Once confirmed/updated, click the “Next Step” button.
Step 2. Confirm the coaches listed. Once confirmed/updated, click the “Next Step” button.
Step 3. Create the invoice. The annual dues are automatically selected. You can use the toggle to select other options such as coach memberships, student memberships, insurance, and the Resource Package. The prices for each item are listed on the right side of your screen, and a running total is at the bottom in blue. When done, “Create Invoice and Proceed to Checkout”.
The system allows you to “Pay Now”, with a credit card or you can email the invoice to yourself or print out the pdf.
Need a Visual? Click here to watch our brief tutorial!
(The GIF will loop continuously; there is no audio.)
How to Create and Link an Account
Read below to learn how to link accounts for students, advisors, and coaches or assistant coaches on your team.
Prefer to watch a video demonstration? Click here!
How to Create and Link a Student Account
- Visit www.speechanddebate.org/join.
- Fill in the required fields and click on the blue Submit button at the bottom of the page.
- The next page explains how to link your new account to your school so you can access member resources. It reads: “Log in to the account you just created below.”
- If you don’t see your Account page, you can get there by clicking the Account link in the upper right corner of the page.
- Click the blue Link To A School button and follow the on-screen directions.
- Enter whether you are a middle school or high school student, then add your state and city, and look for your school in the “School Name” drop down.
- When you locate your school, select “Request Access” and your program advisor will have the opportunity to approve the link request. If you can’t find your school, select “I can’t find my school!” and it will direct you to search from another list. If you still don’t find your school, please email us!
How to Create and Link an Advisor Account
If your school is joining for the first time, please follow this process. Advisors are the main contact for a speech and debate program at a school. Among other permissions, they can create and pay invoices for school, student, and coach memberships. For more information on advisor vs. coach accounts, see Member Roles and Account Permissions.
- Visit www.speechanddebate.org/join.
- Fill in the required fields and click on the blue Submit button at the bottom of the page.
- The next page explains how to link your new account to your school so you can access member resources. It reads: “Log in to the account you just created below.”
- If you don’t see your Account page, you can get there by clicking the Account link in the upper right corner of the page.
- Use the links on the Account page to request access to your school. If you need help, please email us!
How to Create and Link a Coach or Assistant Coach Account
An adult who has an account linked to their school but is not an advisor is known as a coach.
- Visit www.speechanddebate.org/join.
- Fill in the required fields and click on the blue Submit button at the bottom of the page.
- The next page explains how to link your new account to your school so you can access member resources. It reads: “Log in to the account you just created below.”
- If you don’t see your Account page, you can get there by clicking the Account link in the upper right corner of the page.
- Click the blue Link To A School button, enter whether you are a middle school or high school coach, then add your state and city, and look for your school in the “School Name” drop down.
- When you locate your school, select “Request Access” and your program advisor will have the opportunity to approve the link request. If you can’t find your school, select “I can’t find my school!” and it will direct you to search from another list. If you still don’t find your school, please email us!
What is an Advisor?
There are three main roles on an NSDA speech and debate team: advisors, coaches, and students. Check out our Member Roles and Account Permissions guide to see what each group can access from their NSDA account dashboards based on their role and permissions.
The previous advisor left the school. How do I make myself the current advisor?
Mid-year advisor changes (for schools already activated) require an email from the principal or head school administrator, indicating there is a change in advisor and confirming who that advisor is. The email should be sent to info@speechanddebate.org.
May homeschooled students join the National Speech & Debate Association?
Students must join an NSDA member school in order to be eligible for membership as an individual. A school is an accredited, diploma-granting public or private entity recognized by the state. In most states, homeschooled students must compete in academic or extracurricular activities through their zoned school district. The NSDA looks to the individual states to determine what makes for a recognized school. If your state recognizes individual homeschools for participation in school-based activities, your homeschool may be eligible for membership. Contact your state’s activities association to find out more or email info@speechanddebate.org.